UIScene State Restoration with NSUserActivity and SwiftUI on iOS 13 (iPadOS)
Multi-window support introduces fundamental changes to the life cycle of iOS 13 and iPadOS apps. It’s closely connected with the concept of a scene, which represents a single instance of your app’s user interface. Every scene has its own life cycle and there can be more than one scene running at the same time.
I am explaining what are scenes and how they are put together in iOS 13 (iPadOS) App Life Cycle with UIScene.
Since the system manages your app scenes, it may connect and disconnect scenes to reclaim their resources. In this case the user interface is gone and will be replaced with a snapshot. The next time the user opens that scene, they will face an initial window with all unfinished work lost.
The solution is per-scene state restoration, which becomes a vital feature for rich user experience beginning from iOS 13 (iPadOS). In this article let’s find out how to implement scene-based state restoration with NSUserActivity and SwiftUI.
Understanding UIScene and UISceneSession
Understanding what are scene and scene session is a prerequisite if we are to implement state restoration.
Scene is a single instance of your app’s user interface. There are two objects that make up a scene: UIScene represents the user interface part, and UISceneSession is the model part. A single scene is associated with a single session and vice versa. The system manages scenes by means of their sessions, notifying UIApplicationDelegate and UISceneDelegation about the life cycle events. State restoration events are handled by the UISceneDelegate object.
The essence of state restoration is: the system requests from and passes to your scene delegate the
NSUserActivityobjects with latest state.
Understanding NSUserActivity
NSUserActivity represents the state of your app at a moment in time [1]. User activities must be created with two properties in mind:
- They must be lightweight. The whole state data must be put into the
userInfodictionary, which accepts only property-list objects. - They must store the key information about what the user were doing last.
It’s hard to tell when it’s appropriate to create NSUserActivity or update the existing one, since every use case is different. According to Apple, the guidelines are [2]:
- Event is significant, e.g. the user opens a web page.
- Unfinished work may get lost, e.g. when editing a document draft.
- User activities should not be created for small state changes, like minor text edits in a document.
iOS 13 State Restoration Process
Here is the sequence of scene-based state restoration:

When the system is about to detach the scene, it asks your scene delegate to provide an NSUserActivity instance via stateRestorationActivity(for:). The state will be copied to the scene session’s stateRestorationActivity property. The next time the scene is reconnected, your scene delegate will be notified with scene(_:willConnectTo:options:). This is where the scene must be restored to its previous state.
The two methods in the middle are there to support legacy state restoration system, where the state was preserved by saving and restoring the configuration of view controllers. They allow NSUserActivityDelegate (if set) and every UIResponder instance (interested in this activity) to make their updates.
The last word belongs to UISceneDelegate. It gets notified with scene(_:didUpdate:), allowing to make final updates to the user activity object.
Implementing UIScene State Restoration
Prerequisites: Xcode 11, Swift 5.1, SwiftUI, iOS 13 or iPadOS.
Through the rest of the article we’ll setup state restoration for a SwiftUI scene from the ground up. We won’t delve too deeply into SwiftUI to keep focus on the subject.
Modeling App State
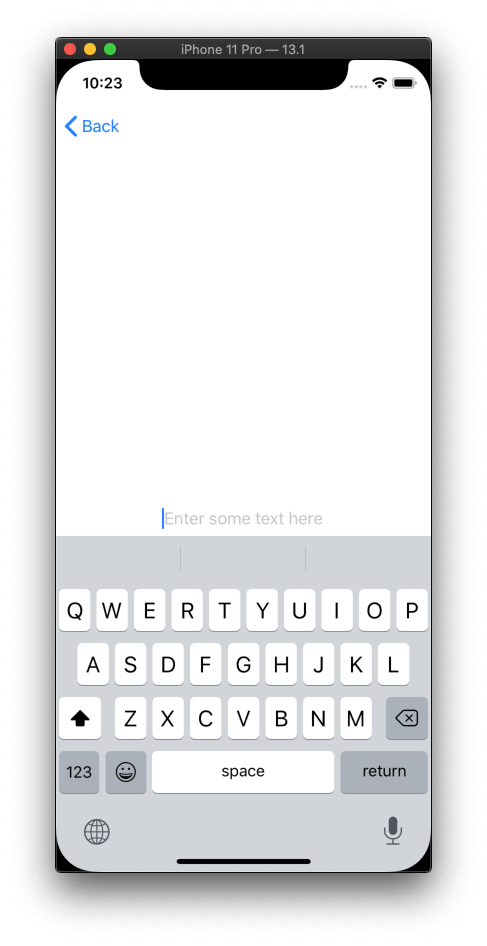
To be able to restore something, we need to model something. Our app has two screens: the home screen and the edit screen. Here is the screenshot of the latter:
The model layer can be described as follows:
var appState = AppState()

class AppState: ObservableObject  {
    @Published var text = ""
    @Published var isEditing = false
}
The global variable appState represents the state of the whole app at a single moment of time. The property text represents the text that we are currently editing; isEditing equals to true when the edit screen is displayed.
Both properties are declared with the @Published property wrapper. Whenever they change, all SwiftUI views that rely on these properties will be refreshed.
Enabling State Restoration in UISceneDelegate
Open the SceneDelegate.swift file that Xcode has already created for us. All we need to do is implement two methods: one to save the appState model and one to restore it.
Add the following method to your SceneDelegate class. It creates an NSUserActivity object and stores the app state into it:
func stateRestorationActivity(for scene: UIScene) -> NSUserActivity? {
    let activity = NSUserActivity(activityType: Bundle.main.activityType) // 1
    appState.store(in: activity) // 2
    return activity // 3
}
Don’t worry about the compilation errors, as we’ll resolve them in a moment. Meanwhile, let’s focus on what the method does:
- Create an
NSUserActivityinstance with specific activity type. - Store
appStatein the newly created activity. - Return the activity to the system.
Implementing this method is enough to tell the system that our app supports state restoration by means of NSUserActivity objects.
The second method has already been created by Xcode. Let’s adapt it to support state restoration:
func scene(_ scene: UIScene, willConnectTo session: UISceneSession, options connectionOptions: UIScene.ConnectionOptions) {
    attachKeyWindow(to: scene) // 1

    if let activity = session.stateRestorationActivity { // 2
        appState.restore(from: activity) // 3
    }
}
Ignore compilation errors for a moment, so that they do not distract us from what’s really important:
- Attach a window to a scene.
- Check if we have an activity to restore.
- Update
appStatewith the activity.
Let’s take a moment to appreciate how easy it was. Apart from several insignificant implementation details, these two methods make the foundation for the scene-based state restoration in your SwiftUI app.
Now that we understand the high-level process, let’s add the missing pieces to fix the compilation errors.
Saving and Restoring App State with NSUserActivity
The app state is saved to and loaded from the userInfo dictionary of an NSUserActivity object. Let’s create an extension to keep closely related things together:
extension AppState {

    // 1
    func restore(from activity: NSUserActivity) {
        guard activity.activityType == Bundle.main.activityType,
            let text = activity.userInfo?[Key.text] as? String,
            let isEditing = activity.userInfo?[Key.isEditing] as? Bool
            else { return }

        self.text = text
        self.isEditing = isEditing
    }

    // 2
    func store(in activity: NSUserActivity) {
        activity.addUserInfoEntries(from: [Key.text: text, Key.isEditing: isEditing])
    }

    private enum Key {
        static let text = "text"
        static let isEditing = "isEditing"
    }
}
- In the
restore(from:)method we check that the activity is of supported type. The rest of the code is mere assigning two properties from auserIntodictionary. - In the
store(in:)method we put two properties into theuserInfodictionary.
The supported types of activities are added to the Info.plist file:

We add a convenience method to read the activity type from the plist file:
extension Bundle {
    var activityType: String {
        return Bundle.main.infoDictionary?["NSUserActivityTypes"].flatMap { ($0 as? [String])?.first } ?? ""
    }
}
Attaching Window to UIScene
Our SceneDelegate still has some bits missing. Now it’s time to fix that.
As we already know, the system reclaims all the resources of the unattached scenes, replacing their user interfaces with snapshots. Therefore, we need to re-create the user interface hierarchy every time the scene re-connects. The following method creates a key window and attaches it to UIWindowScene:
extension UIWindow {
    static func keyWindow<View: SwiftUI.View>(scene: UIWindowScene, root: View) -> UIWindow {
        let window = UIWindow(windowScene: scene)
        window.rootViewController = UIHostingController(rootView: root)
        window.makeKeyAndVisible()
        return window
    }
}
The key window must be retained by the scene delegate, hence we need to assign it to our window property. Add this method to your UISceneDelegate subclass:
func attachKeyWindow(to scene: UIScene) {
  window = .keyWindow(scene: scene as! UIWindowScene, root: ContentView(state: appState))
}
Modeling View Layer with SwiftUI
The view layer is described with two SwiftUI views: ContentView and EditText.
EditText is a SwiftUI view that accepts initial text and notifies about its edits. For this purpose we use the @Binding property wrapper:
struct EditText: View {
    @Binding var text: String

    var body: some View {
        TextField("Enter some text here", text: $text)
            .multilineTextAlignment(.center)
    }
}
ContentView is another SwiftUI view. It has a button that navigates to the Edit screen. We use the @ObservedObject property wrapper to automatically refresh ContentView every time the app state changes:
struct ContentView: View {
    @ObservedObject var state: AppState

    var body: some View {
        NavigationView {
            NavigationLink(destination: EditText(text: $state.text), isActive: $state.isEditing) {
                Text("Edit")
            }
        }
    }
}
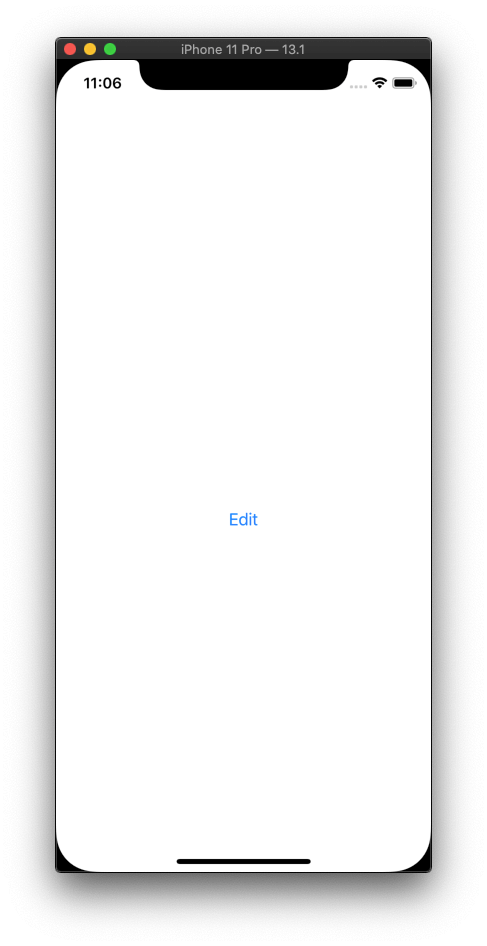
The result looks next:
Testing State Restoration
Now it’s time to test our implementation:
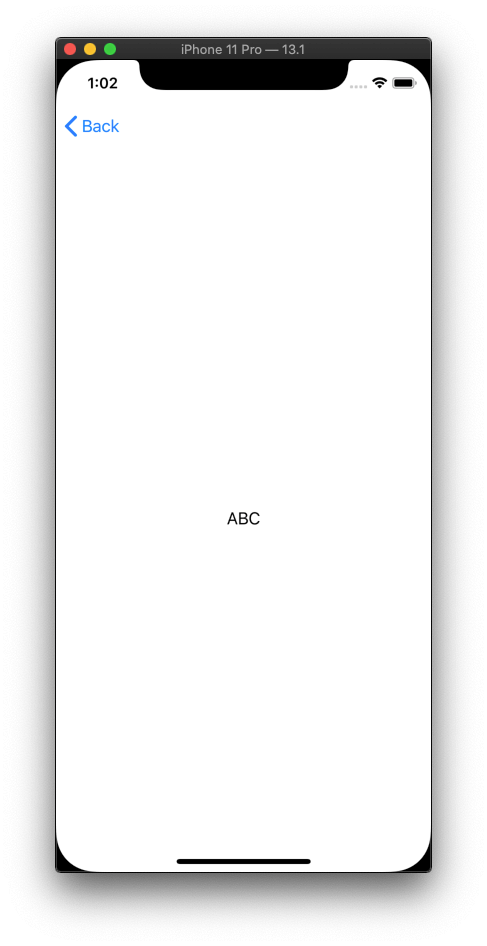
- Run the app using Xcode 11 and go to the Edit screen.
- Type some text, e.g. “ABC”.
- Suspend the app by opening the Home screen on your iPhone simulator. You can swipe it up or use the shortcut: ‘Command (⌘) + Shift (⇧) + H’.
- Stop the Xcode debugger by clicking on □.
- Run the app again using Xcode.
Do not kill the app manually by swiping it up. In this case the system will delete all the state information.
You must see the Edit screen with “ABC” text:
Source Code
You can find the final project here.
Summary
Beginning with iOS 13 and iPadOS, Apple recommends implementing state restoration with NSUserActivity objects on per-scene basis.
User activities must be lightweight, so that they do not slow down the startup time. Typically, you create them to preserve any unfinished work that may get lost, e.g. when editing a draft.
When restoring state of the SwiftUI app, it’s recommended to stick to the best practices outlined in Data Flow Through SwiftUI:
- The model is a single source of truth for your app.
- Views subscribe to model state changes via the
ObservedObjectorEnvironmentObjectproperty wrappers.
The topic of state restoration is closely connected with iOS app life cycle. My recent article on the subject complements what you’ve learned in this tutorial: iOS 13 (iPadOS) App Life Cycle with UIScene.
Thanks for reading!
If you enjoyed this post, be sure to follow me on Twitter to keep up with the new content. There I write daily on iOS development, programming, and Swift.