How to Save Images and Videos to Core Data Efficiently
Core Data has been in iOS and macOS going back as far as anyone can recall. Nonetheless, there is no widely adopted strategy of storing images and videos in Core Data. In this article let’s implement and benchmark most popular Core Data persistence strategies and suggest the most efficient one.
Problem Statement
The information age is well and truly upon us. The volumes of data in surrounding information space increases with striking speed [1]. Such a tendency is reflected in modern iOS and macOS apps. The number and size of multimedia files, or BLOBs, that they operate is growing rapidly as well.
BLOB (Binary Large Object) is a stream of binary data stored as a single file. Images and videos are typical examples of BLOBs.
Caching and offline mode are integral part of vast majority of iOS and macOS apps. From implementation standpoint, these features boil down to efficient storage of image and video files.
The purpose of present article is to provide the efficient way of storing images and videos (i.e. BLOBs) using Core Data and Swift.
Persistence Layer Design
Data storage is among the most important architectural decisions when designing Swift app. Apple provides us with four options:
- Core Data
- Raw files
- Archivation of
NSCoding-compliant objects URLCache
There is no replacement for Core Data when it comes to persistence and traversal of complex object graphs. Core Data is cumbersome, at times pretty complex, – but when approached right, it is a true gem to developers.
To learn more about Core Data architecture and basic operations check out this article.
After picking Core Data as a primary persistence tool, we must decide how to store BLOBs. There are two ways to cut the cake: a database and a combination of a filesystem and a database. The design decision is often guided by personal preferences or how a developer is knowledgeable about each approach.
The folklore tells that a database is generally better for small objects, while filesystem is more suitable for the large ones. But, is it true for Core Data? What are the concrete metrics and tradeoffs? And how the Core Data’s external storage feature affects the performance?
Source Code
To conduct the benchmark, let’s implement a Core Data entity per persistence strategy:
-
ImageBlobWithInternalStorage– stores images in SQLite table. -
ImageBlobWithExternalStorage– utilizes Core Data external storage. -
ImageWithFileSystemStorage– stores image in filesystem.
Here you can find the full project which implements and benchmarks all of them. The Core Data code is located in the main target. The benchmarks are placed into test target not to clutter the main code. The results are printed to console in CSV format and then processed manually in MS Excel.
Saving Image to Core Data SQLite Database
The most straightforward strategy is to save images directly to SQLite table. First, create a new Core Data entity with a single attribute blob:

As you’ve already noticed, the blob type is NSData, hence the image needs to be converted into binary, before it can be saved. The conversion code is simple:
extension UIImage {

    var toData: Data? {
        return pngData()
    }
}
Accessing Core Data directly is a bad practice, so we implement a thin abstraction layer on top of it:
class ImageDAO {
    private let container: NSPersistentContainer

    init(container: NSPersistentContainer) {
        self.container = container
    }

    private func saveContext() {
        try! container.viewContext.save()
    }
}
Next, add methods which insert and fetch the newly created entity to Core Data:
func makeInternallyStoredImage(_ bitmap: UIImage) -> ImageBlobWithInternalStorage {
    let image = insert(ImageBlobWithInternalStorage.self, into: container.viewContext)
    image.blob = bitmap.toData() as NSData?
    saveContext()
    return image
}

func internallyStoredImage(by id: NSManagedObjectID) -> ImageBlobWithInternalStorage {
    return container.viewContext.object(with: id) as! ImageBlobWithInternalStorage
}
We have just implemented ImageBlobWithInternalStorage which saves images directly into database.
Saving Image to Core Data External Storage
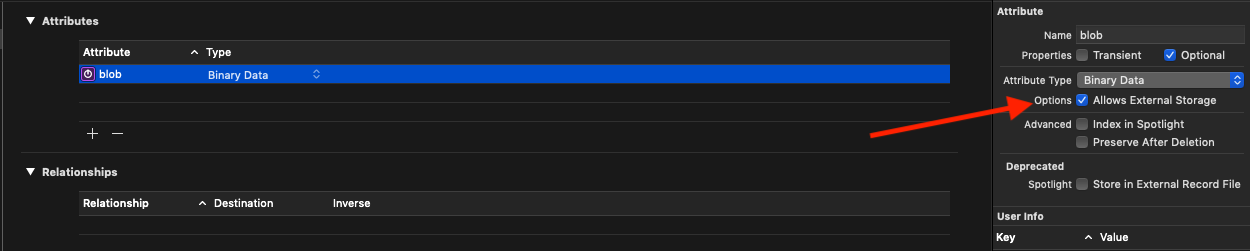
Core Data has lesser-known feature which enables external storage for BLOBs. It will save small objects to a database and larger ones to a filesystem. How to enable it: from Xcode data model editor, select the Binary Data attribute and tick Allows External Storage:
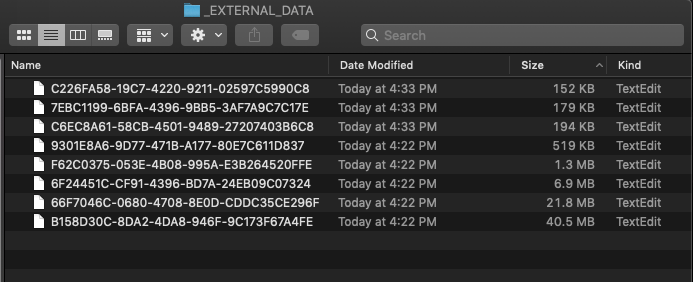
The external storage is physically located in “Application Support” folder, next to the SQLite table:

The empirically defined break-even point of external storage is 128 KB. Objects larger than that are saved to a filesystem, the rest are saved to a database. Here is the content of _EXTERNAL_DATA folder, which shows that the smallest image is 152 KB:
Implementation-wise, ImageBlobWithExternalStorage looks exactly as ImageBlobWithInternalStorage (not a paragon of naming). The only difference is in “Allows external storage” setting for blob attribute. The code is omitted for brevity and can be found here.
Saving Images to Core Data using Filesystem
In third and last design we save image identifiers to Core Data and the images themselves to the filesystem. It has a lot in common with Core Data’s external storage feature, except for this time image storage is implemented manually and makes no exceptions for small objects.
Here is the new entity schema. Identifier attribute serves as a key to the image:

ImageWithFileSystemStorage saves and loads images to a filesystem:
@objc(ImageWithFileSystemStorage)
public class ImageWithFileSystemStorage: NSManagedObject {

    // 1
    lazy var image: UIImage? = {
        if let id = id?.uuidString {
            return try? storage?.image(forKey: id)
        }
        return nil
    }()

    // 2
    var storage: ImageStorage?

    // 3
    override public func awakeFromInsert() {
        super.awakeFromInsert()
        id = UUID()
    }

    // 4
    override public func didSave() {
        super.didSave()

        if let image = image, let id = id?.uuidString {
            try? storage?.setImage(image, forKey: id)
        }
    }
}
Let’s go through the implementation step-by-step:
-
Image is loaded lazily using
idas a key. -
ImageStoragesaves and loads images to a disk. We’ll get back to it few paragraphs below. -
awakeFromInsertis a life cycle method, called whenNSManagedObjectis initially created. It makes a perfect place to initializeid, since the attribute must be set before the entity is first accessed. -
didSaveis another life cycle method, called each time the object is saved. Here we store the image to the filesystem.
Next, extend ImageDAO with the corresponding save and load methods:
func makeImageStoredInFileSystem(_ bitmap: UIImage) -> ImageWithFileSystemStorage {
   let image = insert(ImageWithFileSystemStorage.self, into: container.viewContext)
   image.storage = imageStorage
   image.image = bitmap
   saveContext()
   return image
}

func imageStoredInFileSystem(by id: NSManagedObjectID) -> ImageWithFileSystemStorage {
   let image = container.viewContext.object(with: id) as! ImageWithFileSystemStorage
   image.storage = imageStorage
   return image
}
Image Storage Implementation
ImageStorage is a thin wrapper on top of FileManager which lends itself to saving and loading images. The primary methods fit in less than 20 lines of code:
final class ImageStorage {

    private let fileManager: FileManager

    init(name: String, fileManager: FileManager) throws {
        // In initializer we setup the path and create images directory.
    }

    func setImage(_ image: UIImage, forKey key: String) throws {
        guard let data = image.toData() else {
            throw Error.invalidImage
        }
        let filePath = makeFilePath(for: key)
        _ = fileManager.createFile(atPath: filePath, contents: data, attributes: nil)
    }

    func image(forKey key: String) throws -> UIImage {
        let filePath = makeFilePath(for: key)
        let data = try Data(contentsOf: URL(fileURLWithPath: filePath))
        guard let image = UIImage(data: data) else {
            throw Error.invalidImage
        }
        return image
    }
}
It also contains some boilerplate code which creates file directory and constructs paths, which I’ve removed for brevity. You can find the implementation if you check the full project.
Comparing Core Data Persistence Strategies
This research is primarily concerned with the performance of Core Data read and write operations. I assumed that operations are distributed equally, all objects are equally likely to be written and there is no correlation between them. Hence, the performance can be measured separately.
Test System Configuration
All the tests were coded in Swift 5.1, Xcode 10.2.1. The binaries used to generate tests were compiled with debugging disabled and optimization level set to Optimize for Speed [-O].
| Configurations |
|---|
| 3.0GHz 6-core 8th-generation Intel Core i5 processor |
| 32GB 2666MHz DDR4 memory |
| PCIe-based SSD storage |
| macOS Mojave 10.14.4 |
Sample Data
Image samples were generated programmatically. The size ranges from 4 kilobytes to 53 megabytes.
Results
The results use throughput as the primary indicator of performance.
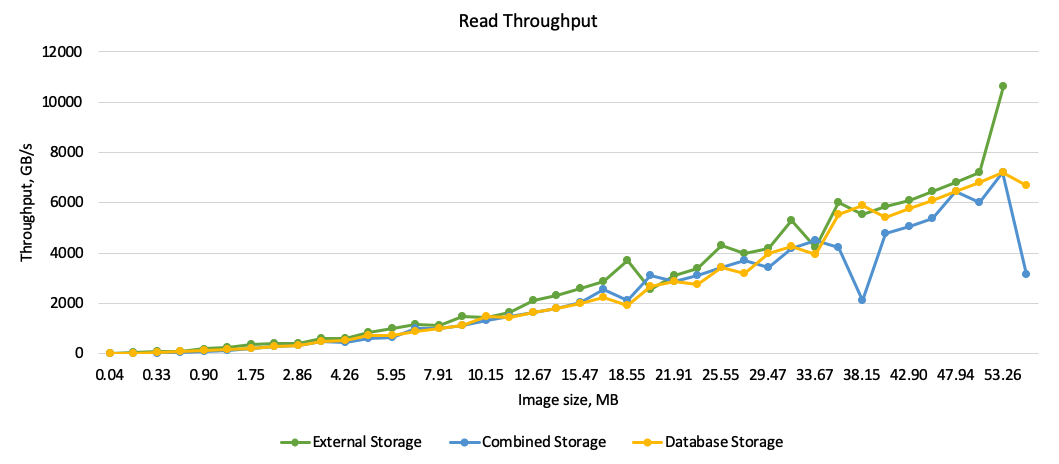
All strategies perform equally on small objects. As object size increases, external storage throughput improves the fastest.
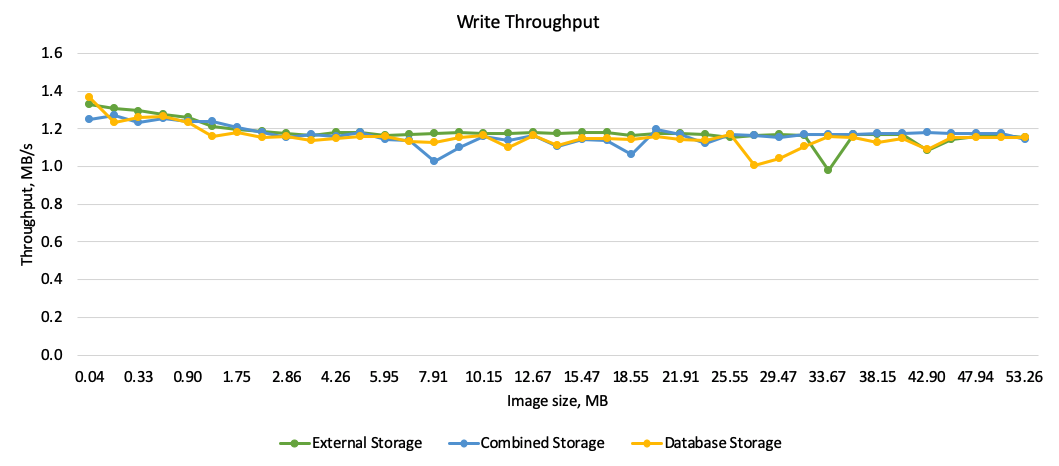
The strategies perform almost equally on all object sizes.
Summary
The results indicate that the performance difference is insignificant among all three persistence strategies. Based on the research, Core Data with external storage enabled should be the preferred choice.
Why not combined storage? The combined storage increases the development effort on implementation and maintenance of consistent database. It also has worst read throughput.
Why not database? BLOBs will drastically increase database size and slow down database operations. Read [2] and [3] for more detail on the subject.
Was the folklore true? Not for the Core Data. However, Microsoft has proven it true for NTFS disk storage vs SQL server tables. Read the full publication here.
Thanks for reading!
If you enjoyed this post, be sure to follow me on Twitter to keep up with the new content. There I write daily on iOS development, programming, and Swift.