Code Generating Swift Mocks with Sourcery
Sometimes it is difficult or even impossible to verify the system under test (SUT) because it depends on other components that cannot be used in the test environment. It can be that they aren’t available (an internet connection), they will not return the results needed (user location), or because executing them would have undesirable side effects (firing an HTTP request) [1].
When you test something, you refer to it as the system under test (SUT).
In such a case it is convenient to replace real dependent-on components with their counterparts that we can fully control. This technique is called Mocking.
Mock objects mimic real objects for testing.
When it comes to implementing mock objects in Swift, what options do we have?
In good old Objective-C days we were able to generate mocks on the fly using OCMock. However, Swift has limited dynamic capabilities, meaning that we must implement mocks manually.
In this article, let’s learn how we can optimize this process by using a code generation tool Sourcery to create mock objects in Swift. We’ll come up with a production-ready setup that you can use in your projects right away.
Mock Objects Overview
The mock doesn’t behave like a real component. It simply provides the same API as the real one so that the SUT thinks it is the real one.
Mocking solves several important problems during unit testing [1]:
- Isolates SUT from dependencies when they are unusable.
- Provides a control point when the dependent-on component does not allow us to exercise the SUT under the necessary conditions.
- Provides an observation point for the SUT’s indirect output that we need to verify. Indirect output means changes that cannot be observed via SUT public API. E.g., when SUT logs a message.
- Speeds up a test suite execution by replacing slow components with their test counterparts.
Mocking comes not without its downsides:
- We are testing the SUT in a different configuration from the one used in production.
- Tests know too much about how the SUT should be structured or behave. That is, the tests will only pass if the SUT is implemented in a particular way, making such tests overspecified and fragile.
Understanding Sourcery
Sourcery is a tool that generates boilerplate Swift code using templates. It is powered by Apple’s SourceKit and allows us to do meta-programming. Among other things, it can generate test mocks.
Here is why we should be using Sourcery instead of writing mocks by hand:
- Reduces development effort on writing and maintaining test mocks.
- Reduces the cost of changing our code.
- Unifies the way we write mocks.
Integrating Sourcery to Xcode Project
There are four ways of integrating Sourcery: binary form, CocoaPods, Homebrew, or Mint.
I do not recommend using Homebrew or Mint because there is no way you can enforce that every team member, as well as CI/CD slave, are using the same Sourcery version.
I also do not recommend CocoaPods integration. The reason is that you’ll often need to customize Sourcery templates, and you’ll have to store custom templates outside the CocoaPods directory anyway.
Instead, we are going to add Sourcery as a binary. Download the latest Sourcery release on GitHub. At the time I am writing this article it is version 1.3.2. Create the tools directory at your Xcode project root and move the Sourcery folder there.
The folder Sourcery-1.3.2 includes the binary at ./bin/sourcery and several default Stencil templates at ./Templates/. The other files are not relevant to us.
Next, create the configuration file sourcery.yml and move it to the tools/ folder root:
sources:
  - ../AutoMockable
templates:
  - ./Templates/AutoMockable.stencil
output:
  ../AutoMockableTests/Generated
The configuration file tells Sourcery:
- To look for source code files in the
AutoMockable/directory. - Use the
AutoMockable.stenciltemplate that generates test mocks. - Store the generated files at
AutoMockableTests/Generated.
Note that I named the Xcode project
AutoMockable, and the test target is calledAutoMockableTests.
Next, create a script that will be invoked during Xcode build phase. The script runs Sourcery with a configuration file that we just defined. Create the file sourcery.sh at tools/ root with the next content:
SOURCERY="Sourcery-1.3.2"
"${PROJECT_DIR}/tools/${SOURCERY}/bin/sourcery" --config "${PROJECT_DIR}/tools/sourcery.yml" --verbose
An unfortunate feature of the default AutoMockable.stencil template is that it dumps all mock objects into a single file. That file becomes unmanageable quickly. To enable per file code generation, we have to add the following annotations to the template:
// sourcery:file:{{ type.name }}+AutoMockable
...
// sourcery:end
Sourcery will generate the template code and then write the parts between the annotations sourcery:file and sourcery:end to corresponding files named <TypeName>Mock+AutoMockable.generated.swift. The final template can be on GitHub. I did two customizations to the original template: (1) enabled per file code generation, and (2) added project-specific import statements.
Since we are going to use the custom template, we’ll have to maintain it independently from the ones bundled with Sourcery. For this reason let’s store the custom template at /tools/Templates/AutoMockable.stencil.
At this point Xcode project directories structure is supposed to look like:
.
|-- AutoMockable
    |-- ...
|-- AutoMockable.xcodeproj
    |-- ...
|-- AutoMockableTests
|   |-- AutoMockableTests.swift
|   `-- Info.plist
`-- tools
    |-- Sourcery-1.3.2
    |   |-- CHANGELOG.md
    |   |-- LICENSE
    |   |-- README.md
    |   |-- Resources
    |   |-- Sourcery.docset
    |   |-- Templates
    |   |-- bin
    |   `-- lib
    |-- Templates
    |   `-- AutoMockable.stencil
    |-- sourcery.sh
    `-- sourcery.yml
Note that the directory Sourcery-1.3.2 is unmodified. Therefore, we can easily upgrade the tool without losing the configuration file, the build script, and the custom template.
Lastly, to enabled Sourcery code generation for our project, call sourcery.sh as Xcode build phase. Go to Xcode, select the test target, add a new Run Script Phase before the Compile Sources phase:
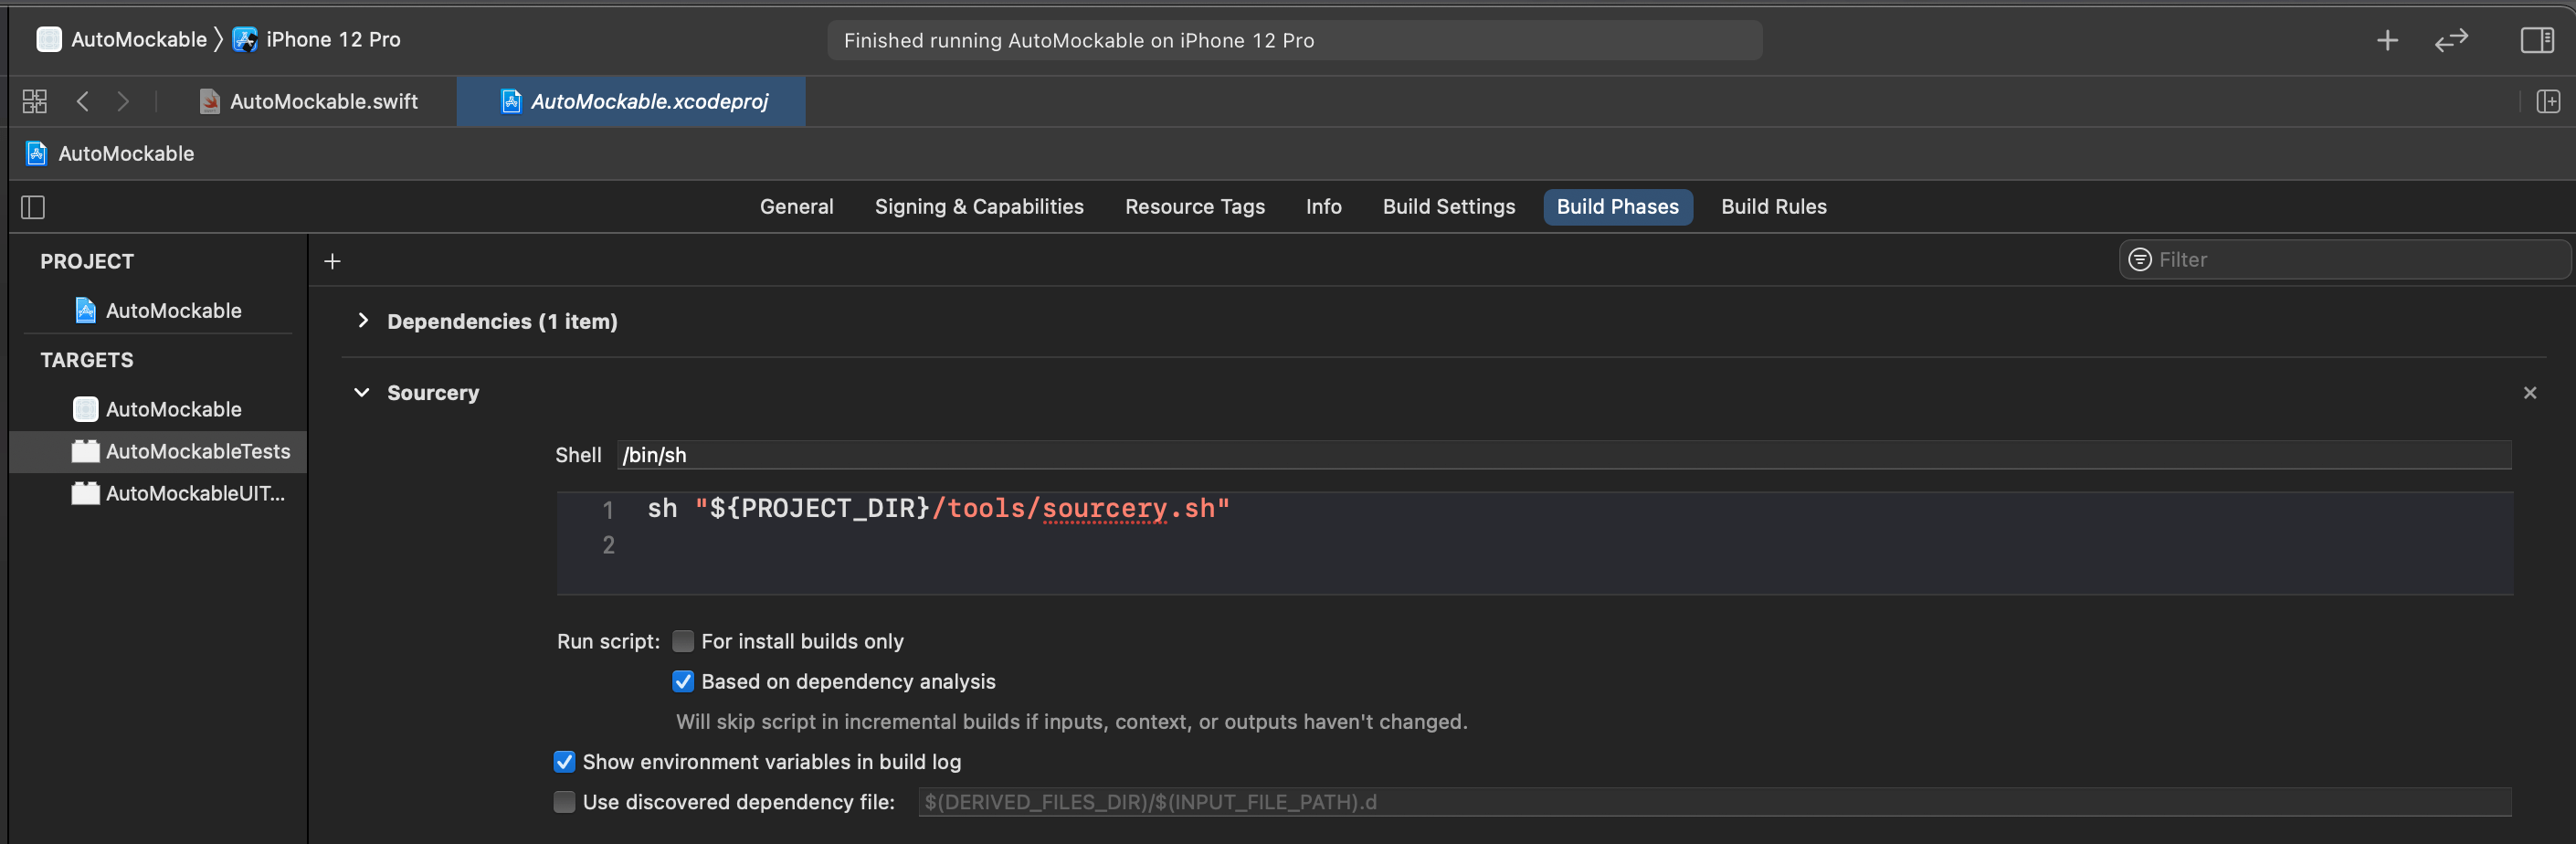
sh "${PROJECT_DIR}/tools/sourcery.sh"
Congratulations on completing all the preparations! Now we are ready to generate some mocks.
Code Generating a Mock
There are two ways of enabling code generation for a protocol. By annotating the protocol with sourcery: AutoMockable (1):
//sourcery: AutoMockable
protocol Cancellable {
    func cancel()
}
And by conforming to the AutoMockable protocol (2):
protocol AutoMockable {}

protocol Cancellable: AutoMockable {
    func cancel()
}
Note that if you are using the second option, the marker protocol AutoMockable must be declared somewhere in your project.
In this article, we will stick with the first option. As an example, we are going to generate mocks for the following protocols:
//sourcery: AutoMockable
protocol HTTPClient {
    func execute(
        request: URLRequest,
        completion: @escaping (Result<Data, Error>) -> Void
    )
}

//sourcery: AutoMockable
protocol Cancellable {
    func cancel()
}

//sourcery: AutoMockable
protocol ErrorPresenter {
    func showError(_ error: Error)
}
- Declare the above protocols in your project. Don’t forget to add the
sourceryannotation like in the example above. - Run tests via the
CMD + Ushortcut. - Open Finder and navigate to the
AutoMockableTestsfolder. - Drag the folder to Xcode, and link the files to the
AutoMockableTeststarget.
You must see the new directory Generated with the following structure:
|-- AutoMockableTests
|   |-- AutoMockableTests.swift
|   |-- Generated
|   |   |-- Cancellable+AutoMockable.generated.swift
|   |   |-- ErrorPresenter+AutoMockable.generated.swift
|   |   `-- HTTPClient+AutoMockable.generated.swift
|   `-- Info.plist
Ideally, generated files must be linked to the Xcode project automatically. In theory, Sourcery supports this via the link key. However, in practice, this feature does not behave as expected. Internally Sourcery uses XcodeProj to link the generated files to the current project. I recommend writing a custom script that calls XcodeProj to overcome this.
Here is how a generated mock looks like:
// Generated using Sourcery 1.3.2 — https://github.com/krzysztofzablocki/Sourcery
// DO NOT EDIT
// swiftlint:disable all

import UIKit
@testable import AutoMockable

class HTTPClientMock: HTTPClient {

    //MARK: - execute

    var executeRequestCompletionCallsCount = 0
    var executeRequestCompletionCalled: Bool {
        return executeRequestCompletionCallsCount > 0
    }
    var executeRequestCompletionReceivedArguments: (request: URLRequest, completion: (Result<Data, Error>) -> Void)?
    var executeRequestCompletionReceivedInvocations: [(request: URLRequest, completion: (Result<Data, Error>) -> Void)] = []
    var executeRequestCompletionClosure: ((URLRequest, @escaping (Result<Data, Error>) -> Void) -> Void)?

    func execute(request: URLRequest, completion: @escaping (Result<Data, Error>) -> Void) {
        executeRequestCompletionCallsCount += 1
        executeRequestCompletionReceivedArguments = (request: request, completion: completion)
        executeRequestCompletionReceivedInvocations.append((request: request, completion: completion))
        executeRequestCompletionClosure?(request, completion)
    }

}
Using Mocks in Unit Tests
Now let’s use the generated mock object in a real-world scenario. Given an API service that uses HTTPClient to execute HTTP requests:
struct CurrencyDTO: Codable, Equatable {
    let currencyCode: String
    let country: String
    let currencyName: String
    let countryCode: String
}

final class CurrenciesAPIService {
    private let httpClient: HTTPClient

    init(httpClient: HTTPClient) {
        self.httpClient = httpClient
    }

    func allCurrencies(completion: @escaping (Result<[CurrencyDTO], Error>) -> Void) {
        httpClient.execute(request: .allCurrencies()) { result in
            completion(
                result.flatMap { data in Result { try JSONDecoder().decode([CurrencyDTO].self, from: data) }}
            )
        }
    }
}

extension URLRequest {
    static func allCurrencies() -> URLRequest {
        let rawPath = "https://gist.githubusercontent.com/V8tr/b8d3e63f7d987d3298cc83c9362f1c6e/raw/ad3f8f697835ec2dbd9a36779f84ffed9911c8aa/currencies.json"
        guard let url = URL(string: rawPath) else { fatalError() }
        return URLRequest(url: url)
    }
}
Let’s test CurrenciesAPIService by replacing HTTPClient with a mock. This is rational because HTTPClient depends on other components that cannot be used in the test environment. Namely, we cannot control internet connectivity and backend services.
The next test verifies that CurrenciesAPIService correctly handles malformed data in response:
import Foundation
import XCTest
@testable import AutoMockable

class CurrenciesAPIServiceTests: XCTestCase {

    let httpClient = HTTPClientMock()
    lazy var sut = CurrenciesAPIService(httpClient: httpClient)

    func test_allCurrencies_withMalformedData_returnsError() throws {
        httpClient.executeRequestCompletionClosure = { _, completion in
            completion(.success(Data()))
        }

        var result: Result<[CurrencyDTO], Error>?

        sut.allCurrencies { result = $0 }

        XCTAssertThrowsError(try result?.get())
    }
}
- We use
httpClient.executeRequestCompletionClosureto set custom response fromHTTPClient. - The mock does not execute network requests, hence the method
allCurrencies()is synchronous. XCTAssertThrowsError()verifies thatResult<T>contains an error.
The next test verifies that CurrenciesAPIService correctly parses a successful response that contains valid data:
class CurrenciesAPIServiceTests: XCTestCase {
    ...

    func test_allCurrencies_withResponseSuccess_returnsValidData() throws {
        let expected = CurrencyDTO(
            currencyCode: "A",
            country: "B",
            currencyName: "C",
            countryCode: "D"
        )
        let data = try JSONEncoder().encode([expected])
        httpClient.executeRequestCompletionClosure = { _, completion in
            completion(.success(data))
        }

        var result: Result<[CurrencyDTO], Error>?

        sut.allCurrencies { result = $0 }

        XCTAssertEqual(try result?.get(), [expected])
    }
}
You’ll find more examples of unit tests in the final project.
Source Code
You can find the complete project on GitHub. It is published under the “Unlicense”, which allows you to do whatever you want with it.
Summary
- Use mocks when SUT dependencies cannot be controlled in the test environment.
- Mock-based tests are often overspecified and fragile. If possible, prefer using real dependencies instead of mocks.
- Use Sourcery to generate mocks in Swift instead of writing them manually. This allows you to avoid boilerplate code, reduces room for mistakes, and enforces a similar code style.
- Configure Sourcery to use per file code generation instead of placing all mocks into a single file which is the default.
Further Reading
If you enjoyed this article, I’ve been writing a lot about testing on iOS with Swift:
Thanks for reading!
If you enjoyed this post, be sure to follow me on Twitter to keep up with the new content. There I write daily on iOS development, programming, and Swift.