Collection View Cells Self-Sizing: Step by Step Tutorial
When working with collection views, chances high that you have spent considerable amount of time sizing cells programmatically. In this article you will learn how collection view cells can dynamically adjust their size based on their content.
Problem Statement
Quality expectations for iOS and macOS apps are continuously being raised, making such features as dynamic fonts and internationalization a must; static app content is rarely seen as well. The strategy of making user interface all-dynamic is the standard by default.
Table and collection views are among the most fundamental user interface components. While table view cells self-sizing has been elaborated numerous times and is widely adopted in community, the exact same feature for collection views is unjustly left unnoticed, despite being around since iOS 8. The present step-by-step guide addresses this issue by explaining how to implement self-sizing collection view cells in iOS from scratch.
Defining Collection View Cells Self-Sizing
Self-sizing is a way of adjusting cells size within collection view layout, where cells are responsible for calculating their own sizes. Three ways to cut the cake exist:
- Layout Property —
UICollectionViewFlowLayout.itemSize. - Delegate —
collectionView(layout:sizeForItemAt:). - Cell — self-sizing cells.
Use of constraints on the collection view cell content view, or override sizeThatFits: are two strategies of implementing collection view cells self-sizing. The former allows to setup sizing (almost) without a single line of code, making it more compelling.
Starter Project
The specifics of step-by-step tutorial imply certain amount of tedious preparations. I’ve got you covered and created a starter project; go ahead and grab it from Github.
To ensure that we are on the same page, review the following highlights from the starter project:
ViewControlleris the entry point of the the sample application. It already has a collection view attached inMain.storyboardand is configured as its delegate and data source. Note that the app crashes at launch, since collection view delegate and data source are not yet implemented.Itemis a model class that backs collection view cells.ViewControllerhas a bunch of items that will be rendered as cells later on.
Wondering why to bother creating
Itemmodels? Then you’ll find my recent article on data-driven table views useful.
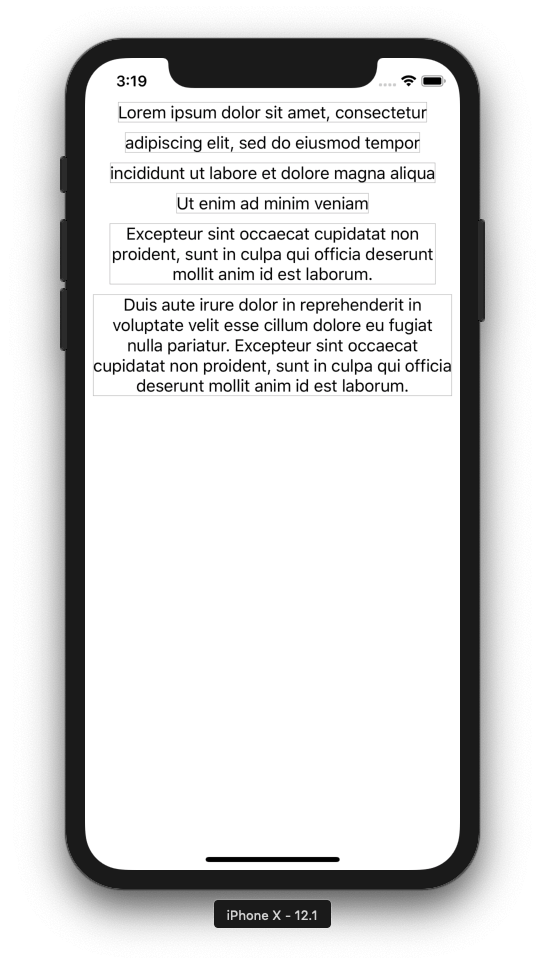
Through the rest of the article we’ll create custom collection view cell with self-sizing enabled. The final result looks next:
Create Custom Collection View Cell
Create a new file CollectionCell.swift with the following code; don’t forget to import UIKit framework at the beginning of the file:
class CollectionCell: UICollectionViewCell {
    @IBOutlet weak var titleLabel: UILabel!
}
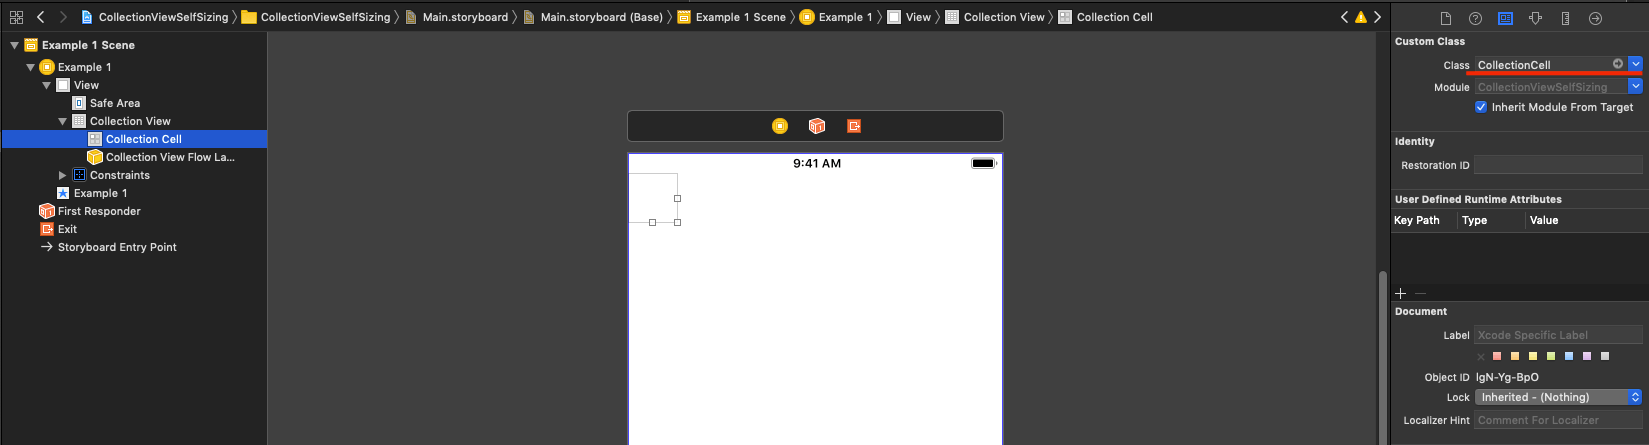
The outlet has been coded, but not connected to the storyboard. Open Main.storyboard, then ViewController > Collection view > Cell Prototype. Set cell’s class and reuse identifier to CollectionCell, similar to the below:
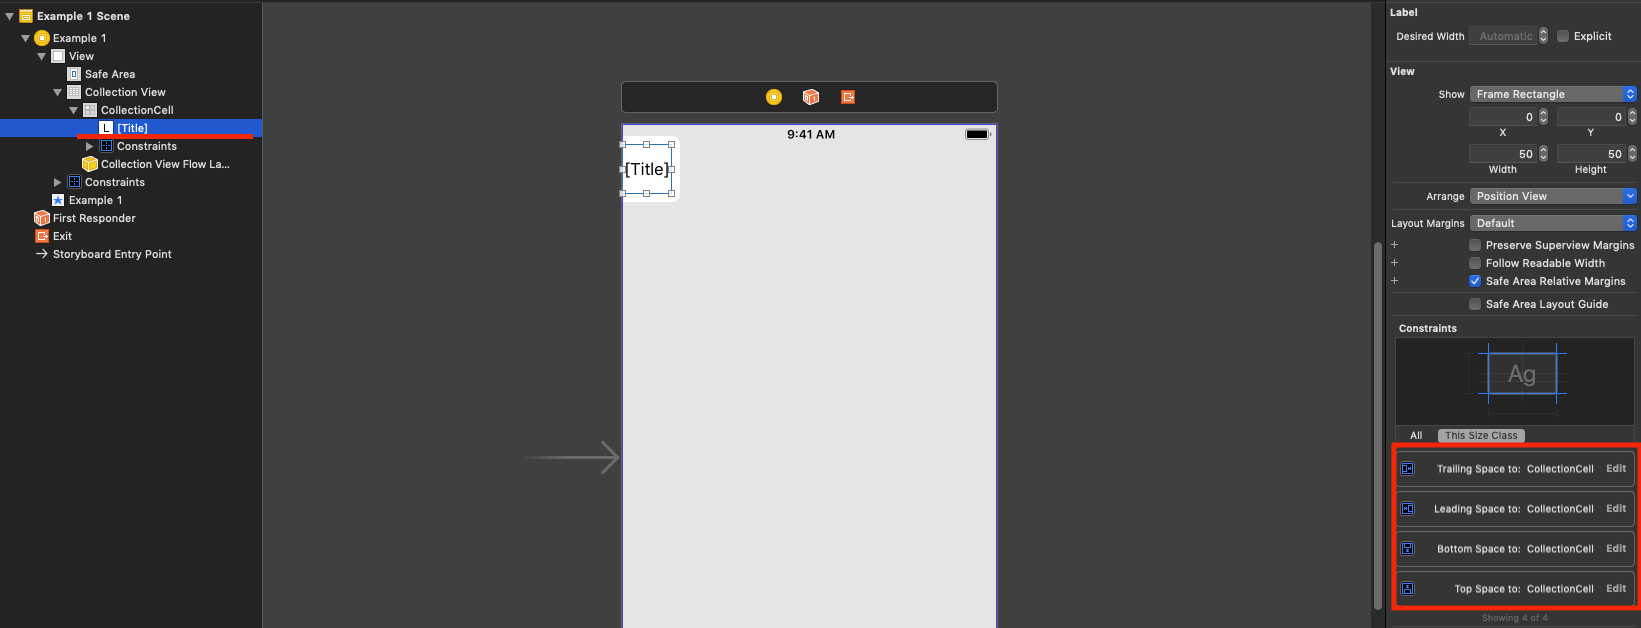
Drag a label and pin it to the edges of the cell by means of auto layout. The good practice is to set title’s text to something meaningful, e.g. “[Title]”, to make it’s purpose clear; also center align label text.
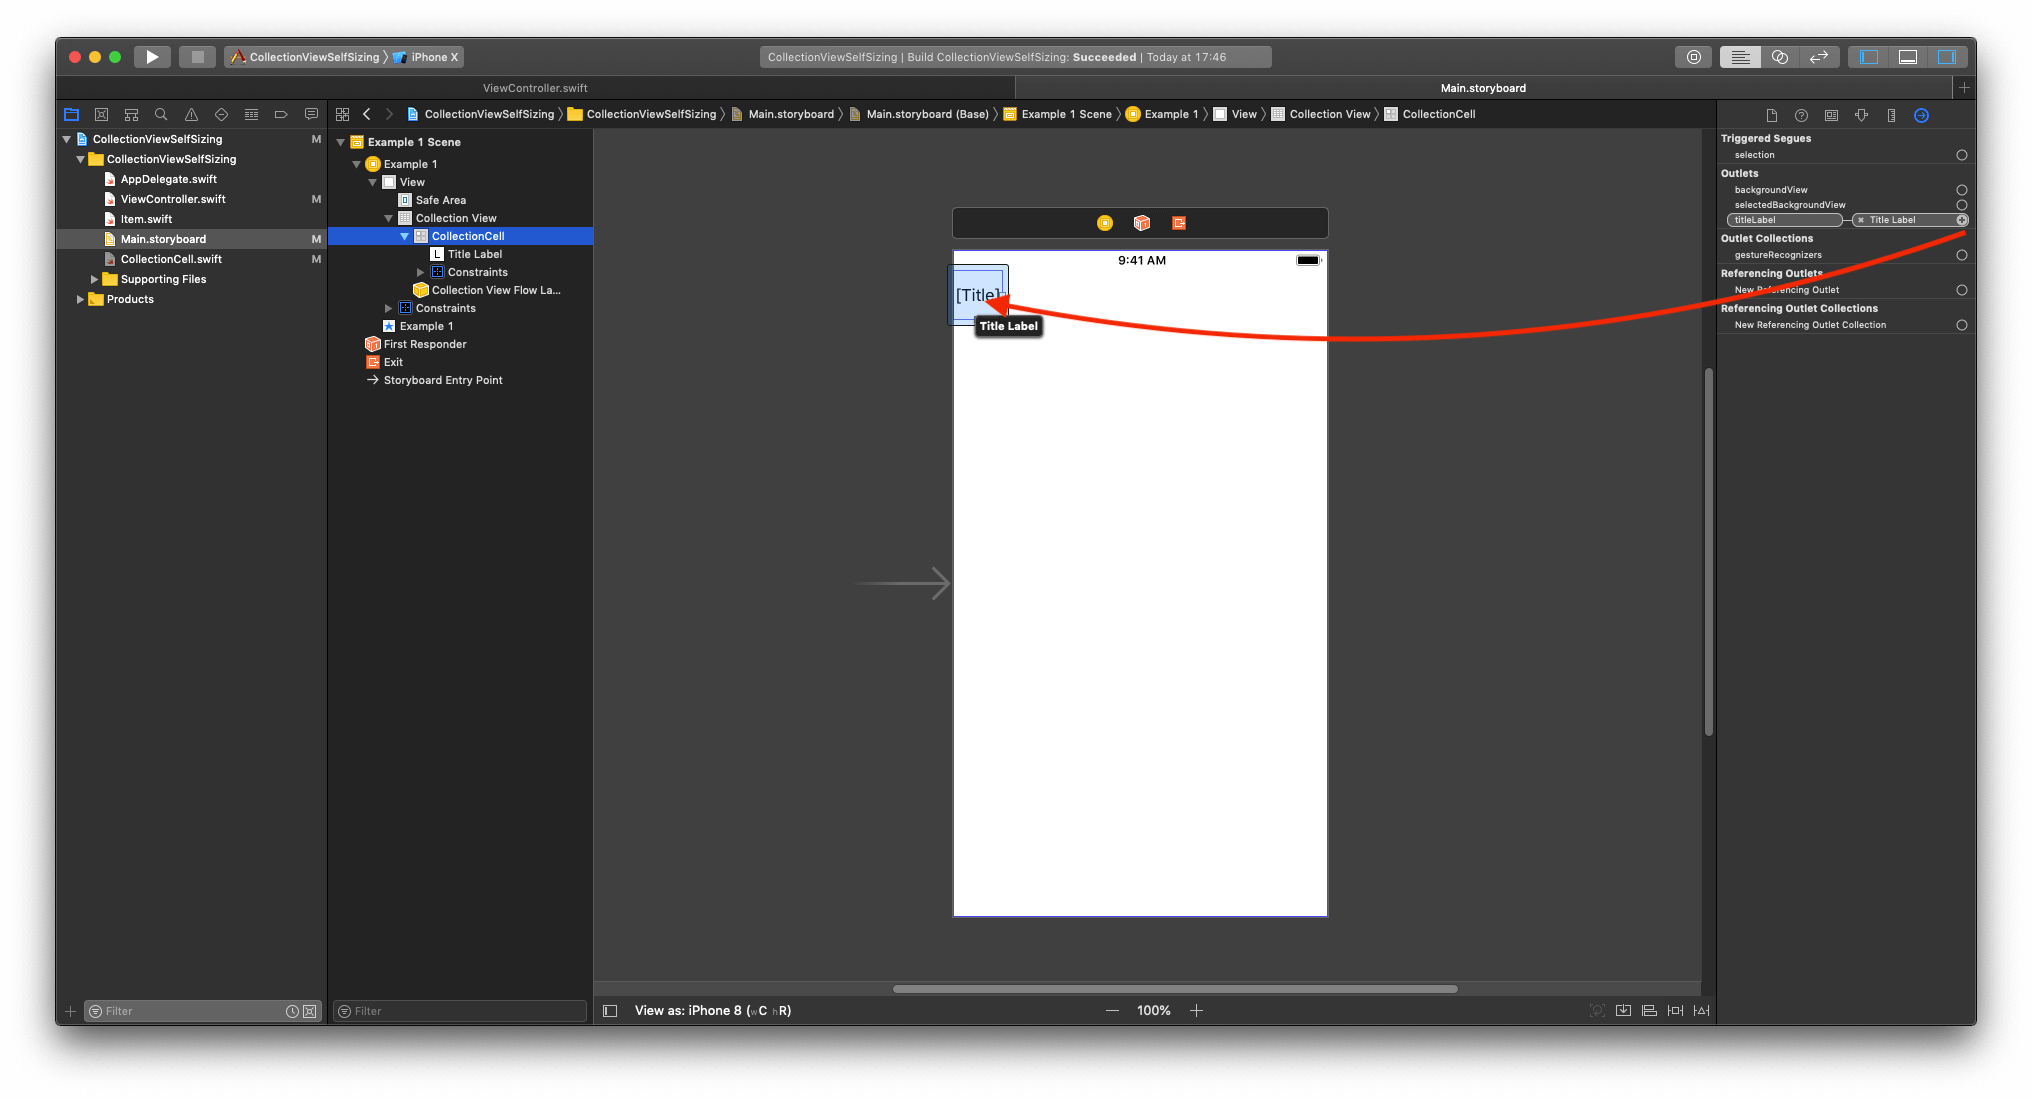
Connect the label from the storyboard with the property titleLabel:
Configure Collection View Flow Layout
Dynamic cells sizing is an opt-in feature of UICollectionViewFlowLayout, which could be enabled by setting estimatedItemSize property to a non-zero value.
Once estimated size has been set, the flow layout computes a first approximation of cells arrangement. The layout is re-calculated when the updated attributes are received. Hence it boosts performance if estimated size is close to the actual one.
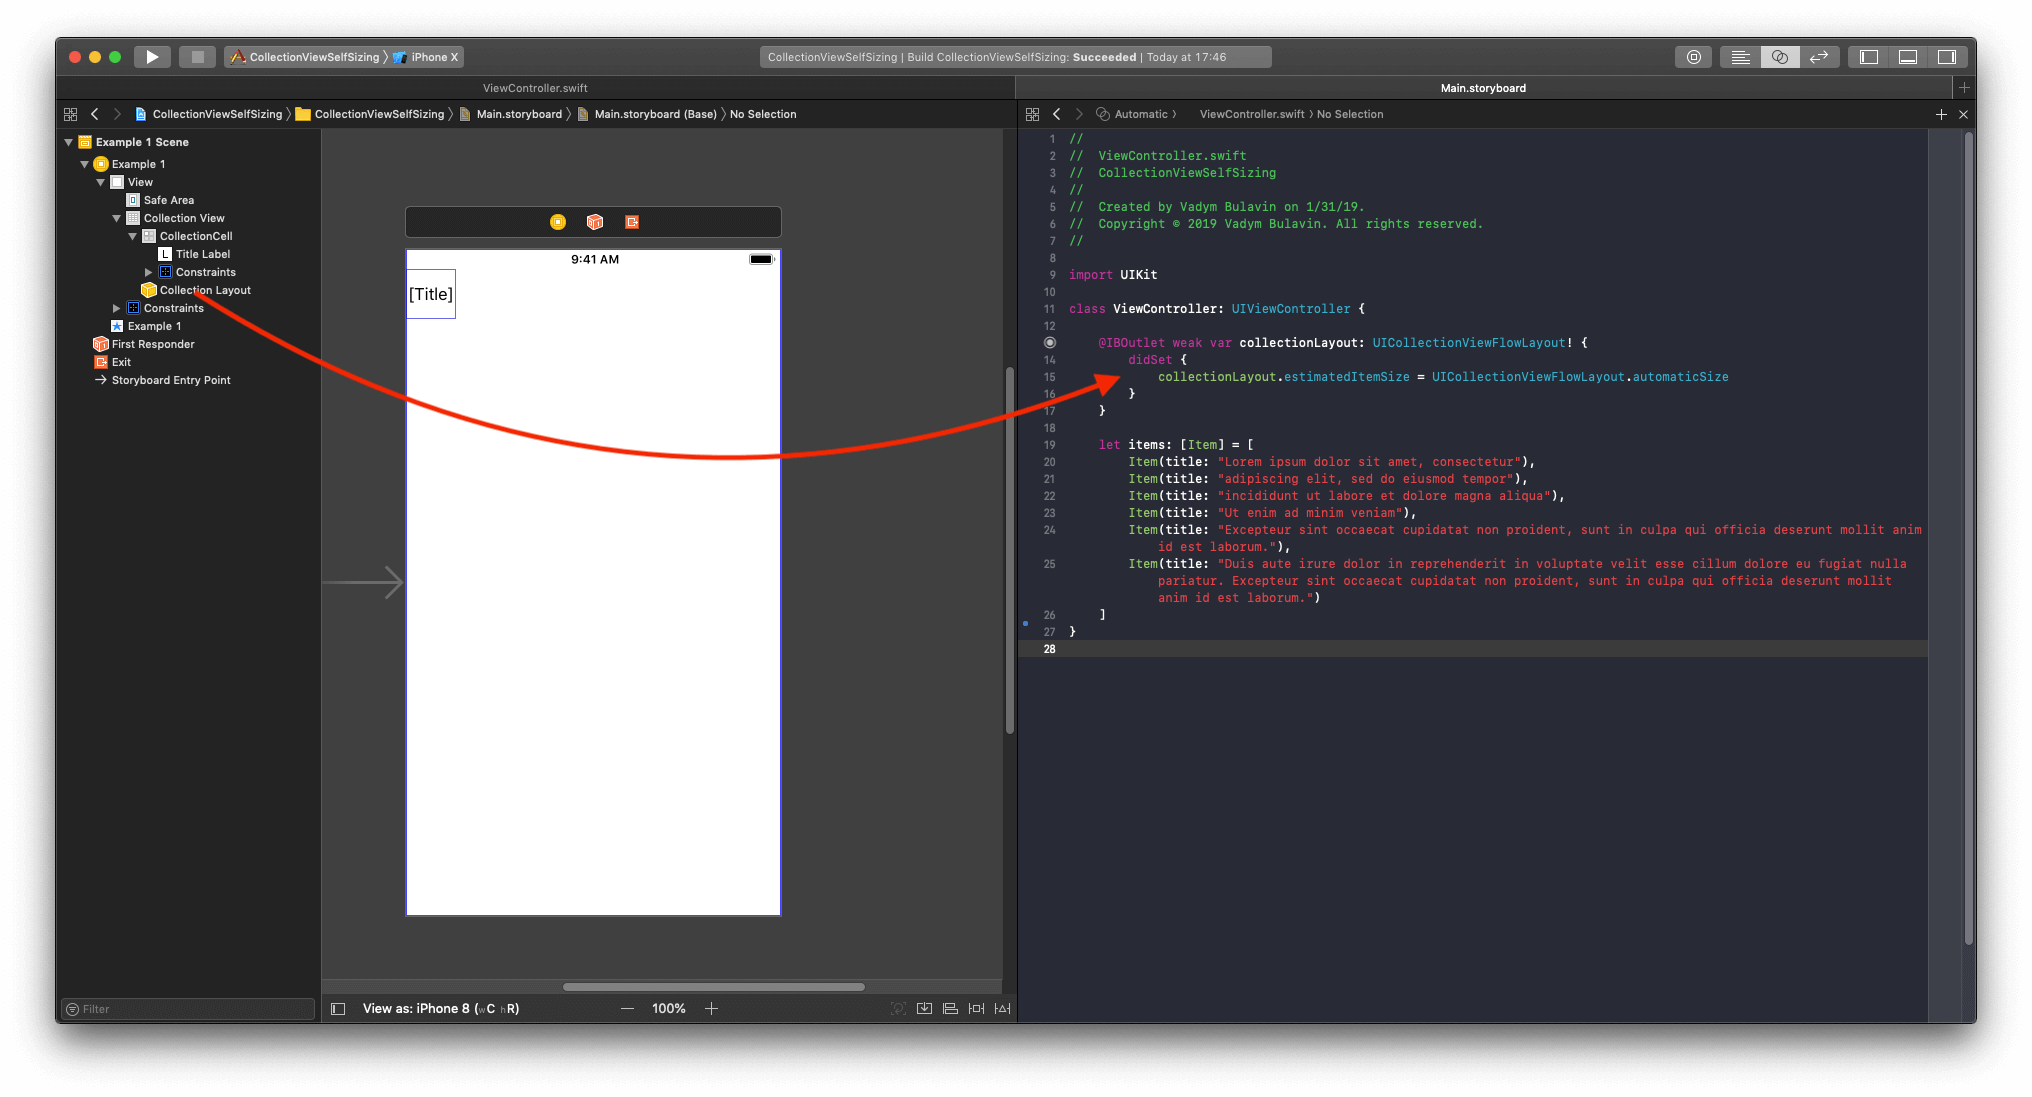
Back to the sandbox project. Drag collectionLayout from the storyboard and create new property collectionLayout. Implement didSet method and set automatic size there:
@IBOutlet weak var collectionLayout: UICollectionViewFlowLayout! {
    didSet {
        collectionLayout.estimatedItemSize = UICollectionViewFlowLayout.automaticSize
    }
}
The result looks next:
Enable Horizontal Self Sizing
Counterintuitively, collection view content view prevents self-sizing, given that it does not have auto layout enabled. To address that, explicitly enable auto layout and pin content view to the edges of the cell in awakeFromNib:
override func awakeFromNib() {
     super.awakeFromNib()

     contentView.translatesAutoresizingMaskIntoConstraints = false

     NSLayoutConstraint.activate([
         contentView.leftAnchor.constraint(equalTo: leftAnchor),
         contentView.rightAnchor.constraint(equalTo: rightAnchor),
         contentView.topAnchor.constraint(equalTo: topAnchor),
         contentView.bottomAnchor.constraint(equalTo: bottomAnchor)
     ])
 }
The time has come to fix application crash and implement collection view data source and delegate methods. Alongside configure collection view cells by setting border and title label text. The below code goes to ViewController:
// MARK: - Collection view delegate and data source methods

extension ViewController: UICollectionViewDataSource, UICollectionViewDelegateFlowLayout {

    func collectionView(_ collectionView: UICollectionView, numberOfItemsInSection section: Int) -> Int {
        return items.count
    }

    func collectionView(_ collectionView: UICollectionView, cellForItemAt indexPath: IndexPath) -> UICollectionViewCell {
        let cell = collectionView.dequeueReusableCell(withReuseIdentifier: Constants.reuseID, for: indexPath) as! CollectionCell

        cell.titleLabel.text = items[indexPath.item].title
        cell.layer.borderWidth = Constants.borderWidth
        cell.layer.borderColor = UIColor.lightGray.cgColor

        return cell
    }
}

// MARK: - Constants

private enum Constants {
    static let spacing: CGFloat = 16
    static let borderWidth: CGFloat = 0.5
    static let reuseID = "CollectionCell"
}
The Constants enum is a nice way to organize constants. You can disregard spacing for now, as we’ll get back to it few paragraphs below.
Now launch and inspect the project. Here is how it is supposed to look:
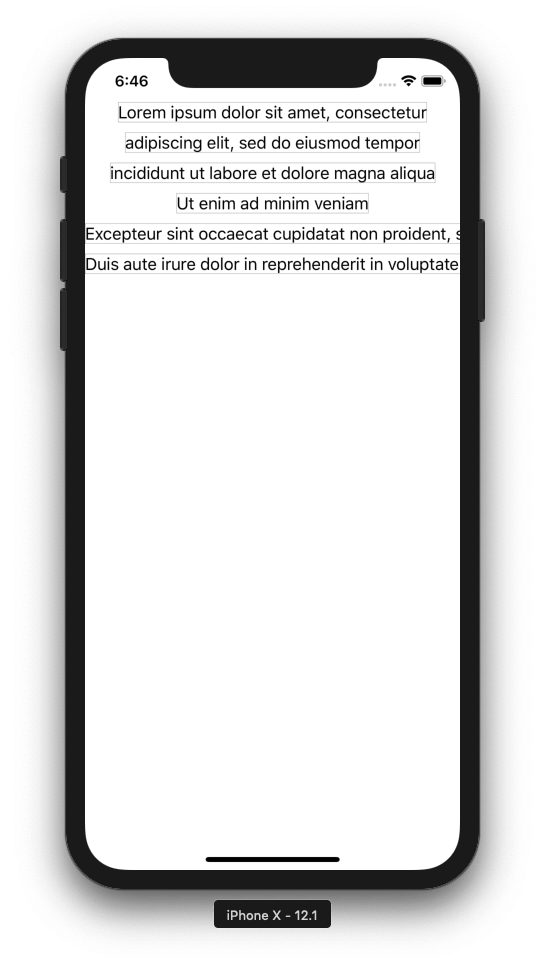
The above 4 cells look fine, while the rest do not fit the screen. You’ll notice numerous debugger warnings, saying that “The item width must be less than the width of the UICollectionView …“. This reveals the need to constraint cells horizontally and force them to grow in height.
Enable Vertical Self-Sizing
Enabling vertical self-sizing is a two-step process. Firstly, titleLabel need to be multi-line to support vertical growing. Secondly, the cell should be limited horizontally with auto layout width constraint.
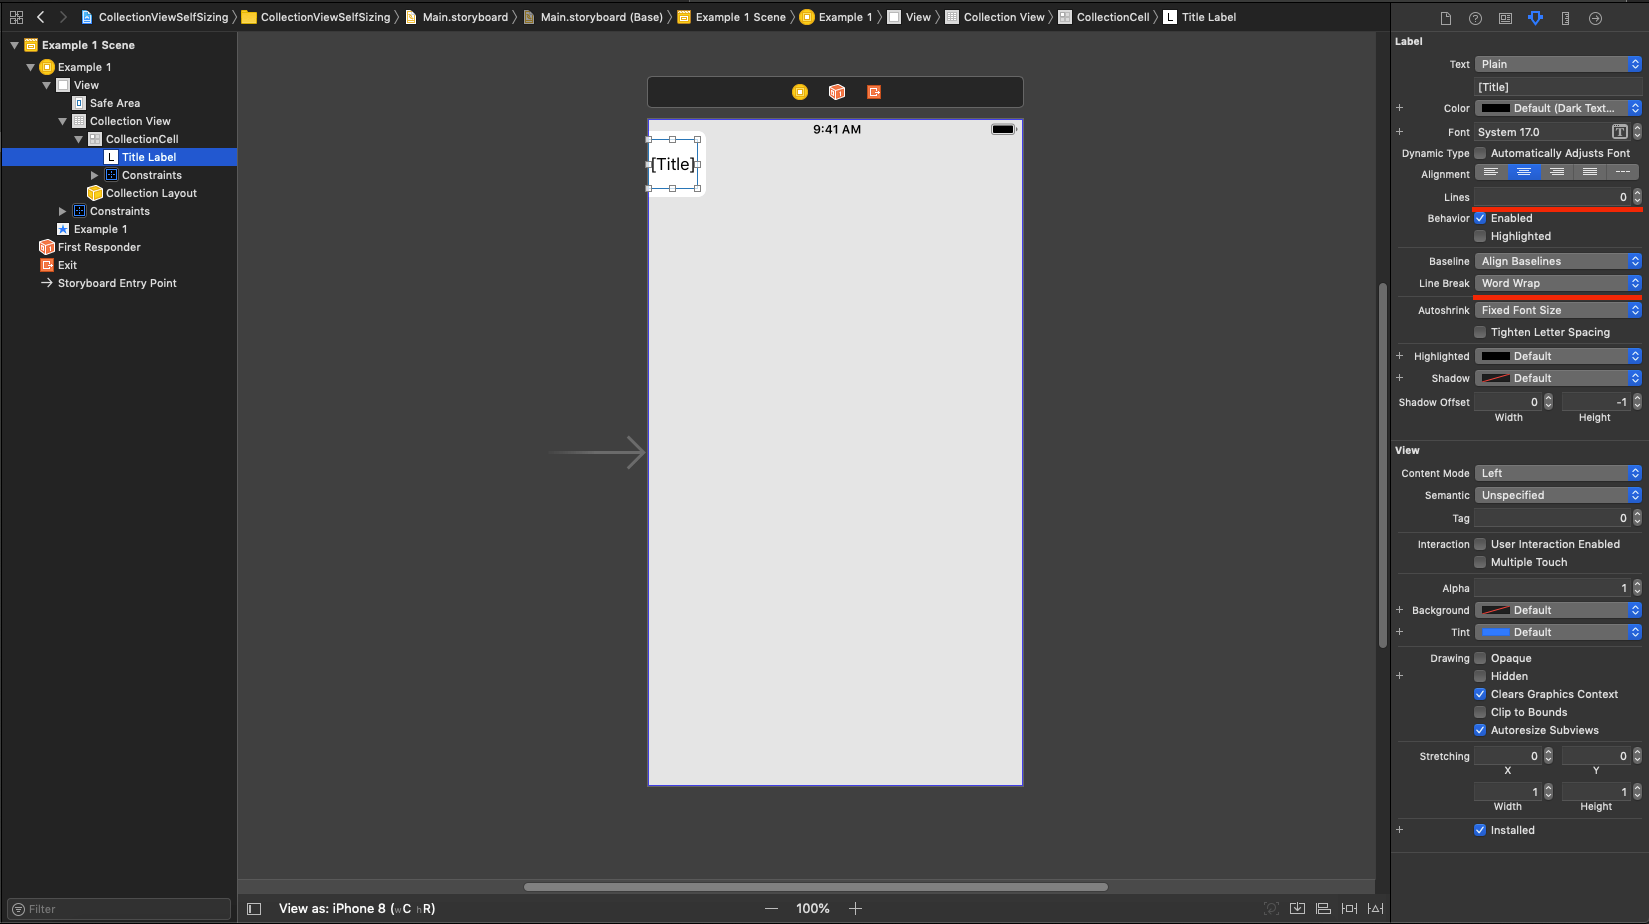
1. Open Main.storyboard > Select label > in Attributes Inspector set number of lines to 0 and Line Break to Word Wrap. The related settings are highlighted below:
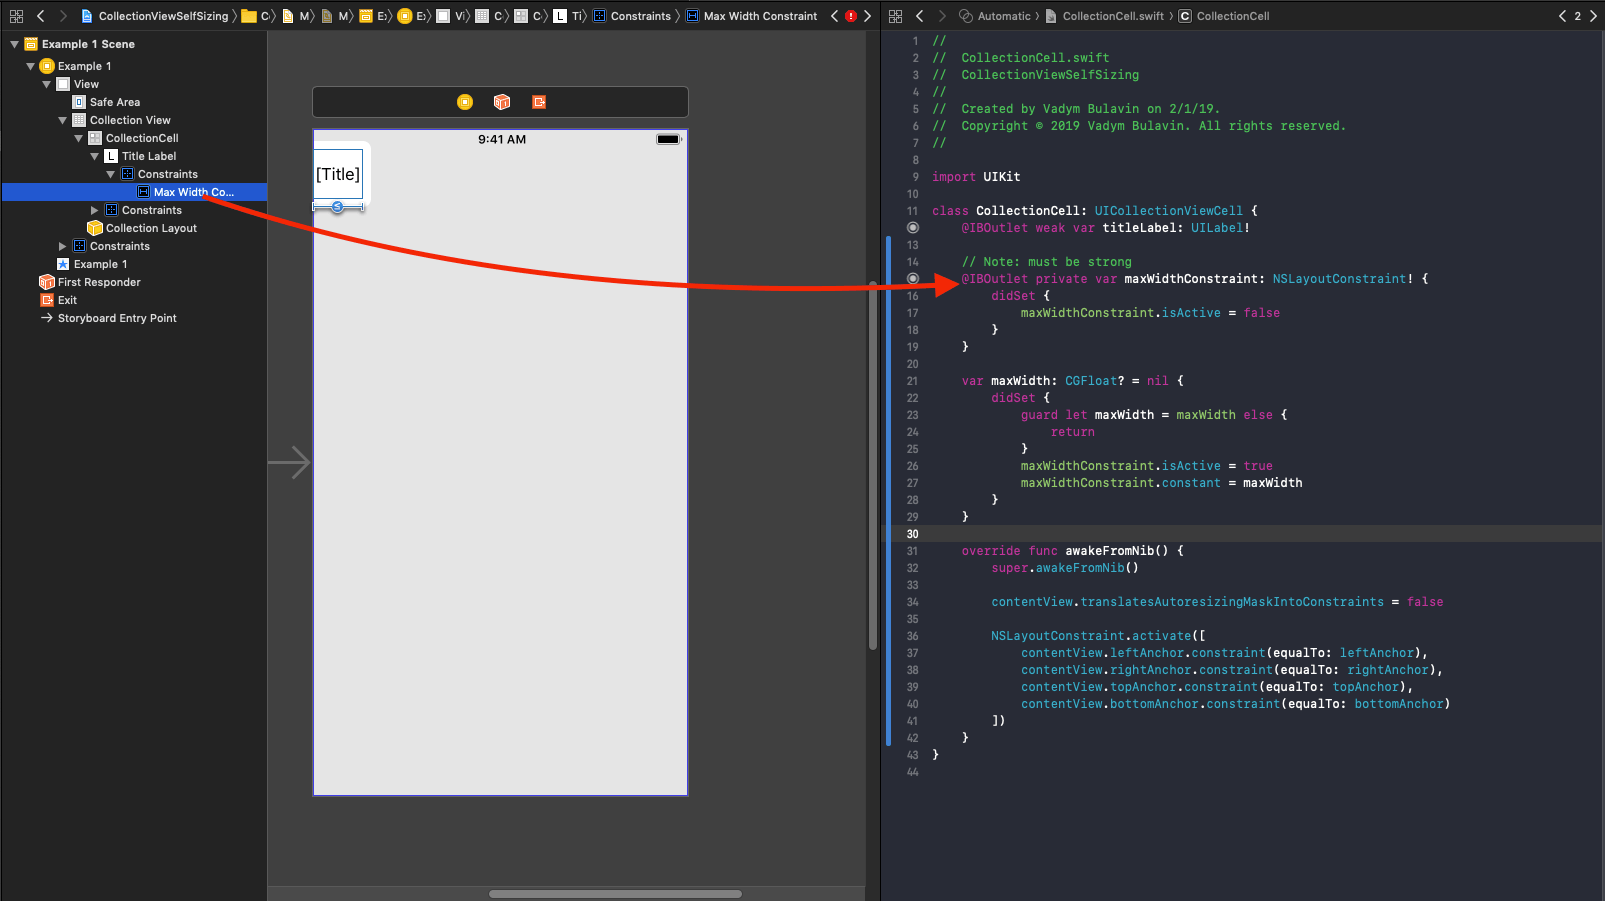
2. Create maxWidthConstraint property for auto layout constraint; this allows to modify constraint dynamically. The constraint itself is hidden behind another property maxWidth for encapsulation purpose.
 // Note: must be strong
 @IBOutlet private var maxWidthConstraint: NSLayoutConstraint! {
     didSet {
         maxWidthConstraint.isActive = false
     }
 }

 var maxWidth: CGFloat? = nil {
     didSet {
         guard let maxWidth = maxWidth else {
             return
         }
         maxWidthConstraint.isActive = true
         maxWidthConstraint.constant = maxWidth
     }
 }
The constraint is immediately set to inactive, thus a strong reference to it must be kept to prevent from releasing. Once maxWidth is set to non-nil value, the constraint is activated and width is applied. Such design makes the intent more clear and encapsulates the implementation detail.
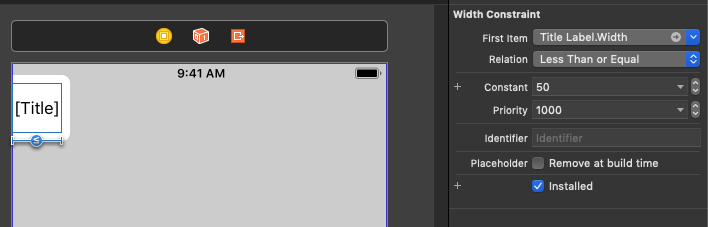
Add width constraint to the label with relation less than or equal X, where X is anything above zero,50 in my case. The constraint is depicted below:
Connect the constraint with the maxWidthConstraint outlet.
Lastly, limit cells width to screen bounds, so that the text can grow vertically when horizontal limit is reached. Open ViewController.swift and add next line to collectionView(:cellForItemAt:) method:
cell.maxWidth = collectionView.bounds.width - Constants.spacing
Now launch the project to see how the layout has changed. It is supposed to look next:
That’s it, well done on completing the tutorial.
Collection View Cell Self-Sizing Checklist
Here is brief summary of the steps to enable collection view cell self-sizing:
-
Identify dynamic elements within collection view cell which should grow.
-
Setup auto layout constraints in a such way, that dynamic elements are pinned to all edges of the content view either directly or indirectly, ex. when wrapped in containers like
UIVieworUIStackView. -
Enable auto layout for cell content view and pin it to the edges of the cell.
-
Add extra width constraint with
less than or equalrelation, which limits cell from growing horizontally beyond screen bounds. -
Make sure that dynamic UI elements can grow vertically when content increases. Some examples are: make
UILabelmulti-line, disable scrolling forUITextView. -
Set cell maximal width from
collectionView(:cellForItemAt:). -
Set collection view flow layout property
estimatedItemSizeto a non-zero value, typically toUICollectionViewFlowLayout.automaticSize.
Source Code
You can find final project here. And here is starter project.
Summary
Collection view cells self-sizing could be implemented either programmatically via sizeThatFits: or by means of auto layout. The latter is way easier, since it allows to design complex dynamic user interfaces in visual editor, without a single line of code.
Collection view cells self-sizing with auto layout conceals a number of pitfalls, which might keep you busy for a couple of hours, if not days. Current step-by-step tutorial highlights such issues and provides a checklist with high-level summary of the actions required.
Thanks for reading!
If you enjoyed this post, be sure to follow me on Twitter to keep up with the new content. There I write daily on iOS development, programming, and Swift.